Getting Started with Code Editor
Creating a Site
Launch Code Editor, the tap the + button in the upper right corner and choose the option for New Site….
The Site editor is separated into three tabs along the top: Site, Server, and Terminal.
Site Tab
Select the Site Tab (with the leaf icon) to get started.

- Nickname
- The name that will be displayed for this site in the Sites tab.
- Local Path
- The local folder you will be placed in upon connection to this site.
- Remote Path
- The default web server folder you will be placed in upon connection to this site, and the base folder used for generating preview URLs.
- Remote URL
- The root URL for the website. This will be used to generate a thumbnail image for the site, and as the base URL for previewing remote pages.
Server Tab
Select the Server Tab (with the globe) to enter the details for your remote server or hosting provider.

The following settings can be configured for each site:
- Server
- The file transfer protocol to be used with the web server. FTP and SFTP are common.
- Passive mode
- (FTP protocol only) Determines whether Code Editor connects to the server for data transfers (passive mode), or vice-versa (active mode). (Note: Most commonly, passive mode is used. Passive mode means that Code Editor initiates connections to the FTP server, rather than the other way around.)
- Address
- The address of the web server hosting the site.
- Port
- Which port to connect to for file transfers. This depends on which file transfer protocol is used, and usually does not need to be manually changed.
- Username
- The user name required to log into the web server hosting the site.
- Password
- The password required for the above user name. (If you use private keys instead of passwords to connect to the web server, tap the key icon in this field and select the appropriate key file. The key icon will glow blue if a private key is associated with the site.)
-
If you’d prefer to not store your passwords in the iOS keychain you can leave the password blank and enter it during the connection process.
-
If you are unsure of what to enter contact your server administrator or web hosting provider for server address, user name, or password information.
Terminal Tab
Select the Terminal Tab (with the prompt caret) to enter the SSH connection details for your remote server.

- SSH Server
- The address of an SSH server associated with this Site. Generally, this is the same address as the web server.
- Port
- Which port to connect to for SSH. The default port (22) is usually correct, but may be edited if necessary.
- User Name
- The user name required to log into the SSH server.
- Password
- The password required for the above User Name. (If you use private keys instead of passwords to connect to the web server, tap the key icon in this field and select the appropriate key file. The key icon will glow blue if a private key is associated with the site.)
- Startup Command
- A command that will automatically sent to the server upon a successful connection.
- Terminal Type
- Defines how the information will be exchanged with the remote server. You can leave this at the default setting if you are unsure of the connection type.
- Automatically Connect
- Enable this option to automatically connect to the remote server when opening a new terminal session.
- Delete Sends ^H
- Some servers expect a different keyboard command for
Delete. If the delete key isn’t working properly try toggling this setting. - Agent Forwarding
- Enable this setting to use agent forwarding for this server. Details about agent forwarding can be found on Steve Friedl’s Tech Tips Guide.
The File Browser
Tap any Site to connect and open Code Editor’s File Browser.
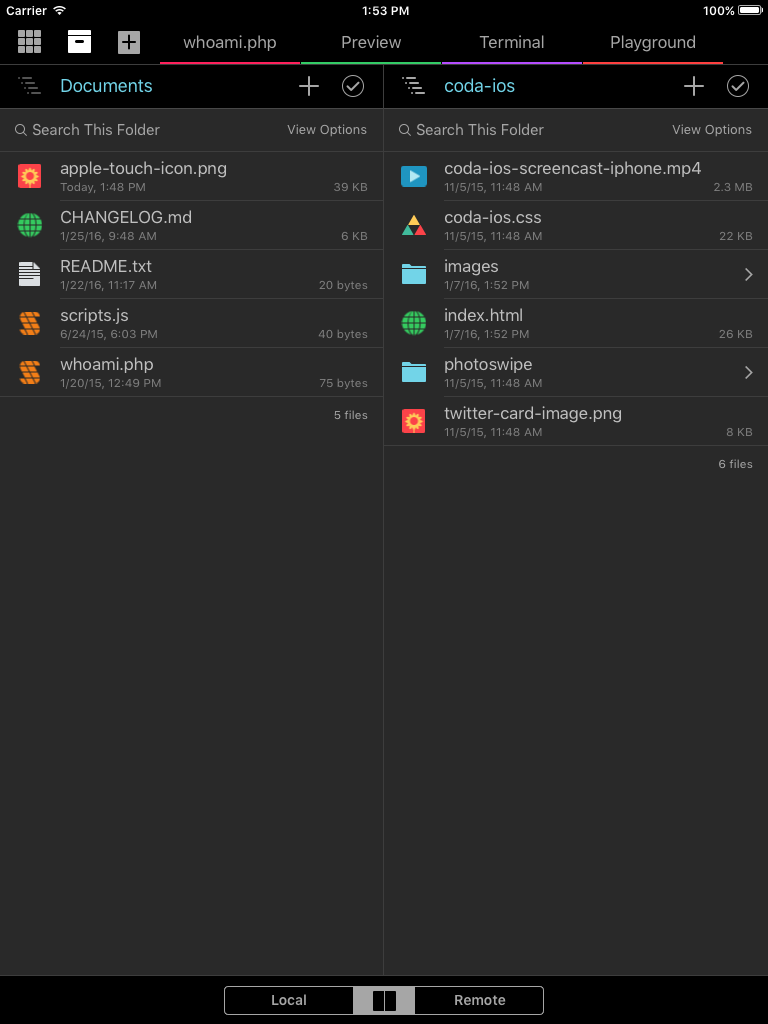
The File Browser is split vertically into two halves: the local browser on the left and the remote browser on the right.
The local browser shows files that live in Code Editor on your iOS device, and the remote browser shows you files that reside on some other machine; usually a web server.
The File Browser has many of the same options as the OS X’s Finder. You can tap to open a folder or get more detailed information about a specific file. Drag-and-drop files to move or transfer them from local to remote (or vice-versa).
The Tab Bar
Across the top of the window is the tab bar. The tab bar shows thumbnails of all open tabs, and indicates which tab you’re currently viewing with a highlighted border.
On the left side of the tab bar are three buttons. The Sites button on the far left closes the currently active site and returns to the main sites page. The second, Files button will return to the file browser for the currently active site. Tap the New Tab button (+) to create a new tab.
You can create as many tabs as you like. Tap an existing tab to switch between them. Tapping the currently active tab will display information about that tab and allow you to close the tab.
There are four different kinds of tabs which can be created: Document, Preview, Terminal, and Playground.
Document tabs allow you to open and modify text files, as well as preview web content.
Preview tabs allow you to display a web browser preview of a document.
Terminal tabs allow you to open an SSH connection to a remote computer, or a command line interface to the Mac you’re working on.
Playground tabs allow you to load and test JavaScript files from Code Editor’s local storage.
Each type of tab will be covered in its own section later on.
The Local/Remote Switcher
Located at the center-bottom of the Files tab is the switcher. It allows you to switch between displaying local files only, remote files only, or both (the center option).
Navigation Bar
At the top of each file browser is the file navigation bar.
The left side of the navigation bar shows the name of the current directory. Tapping the name of the current directory allows you to switch to a folder higher in the directory structure.
Tap the + button to create a new file or import an existing document or image.
To select multiple files, tap the checkmark button on the far right side of the navigation bar.
Folder Search and View Options
Below the File Navigation Bar you can search the current folder or change how files are sorted in the browser.
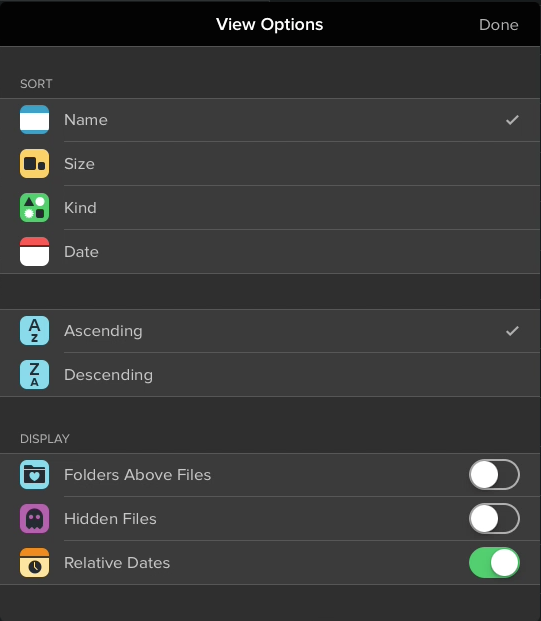
Tapping View Options displays a list of sort criteria and the option to show hidden files and folders.
File Information
Tapping a file will display a list of actions that can be performed. The list of actions will have different options depending on the file type and if it is located on the local or remote section of the File Browser.
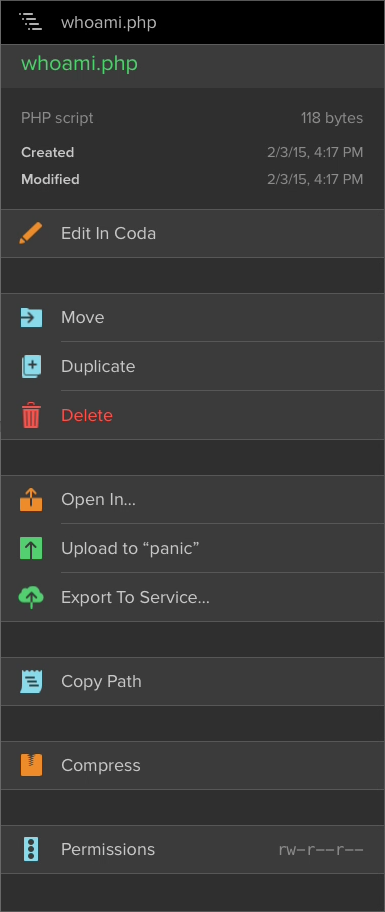
- Edit In Code Editor
- Use this to open the file in Code Editor’s text editor.
- Move
- Select this option to move the file to another destination on the same server.
- Duplicate
- Make a copy of this file and select the location the file will be created.
- Delete
- Completely remove the file. Warning, this action cannot be undone!
- Open In…
- Open a copy of this file in another iOS app on your device.
- Upload to “server”
- Upload a copy of the file to the currently connected remote server.
- Export To Service…
- Send a copy of the file to iCloud Drive or other available service.
- Copy Path
- Copies the file’s path to the clipboard.
- Copy URL
- Copies the file’s URL to the clipboard. Note: This feature is displayed for remote files if you have set a Remote URL defined in the Site settings.
- Compress
- Compress a local file into a .zip archive.
- Decompress
- Decompress a local .zip archive.
- Permissions
- View and edit the file permissions.
The Editor
Here is a screenshot of a basic HTML document open in a document tab in Code Editor:

At this point you should be familiar with the Sites, Files, and New Tab buttons in the left side of the tab bar. (If not, now’s a good time to review.)
On the right side of the tab bar you’ll see (from left-to-right) a few editor specific actions.
- Clips
- Have a handful of code bits you re-use a lot? Tap the clips icon and load them in. Now you can insert them with a single tap.
- Find / Replace
- Use the find and replace banner — and its breakthrough wildcard button — to easily replace, swap or re-arrange your text.
- Preview
- Quickly open a preview of the current document in a built-in web browser.
- Save
- Tap the green checkmark to save all changes to the current document.
Editor and Document Settings
Tapping on the active editor tab opens settings for the current document and general settings for the editor.
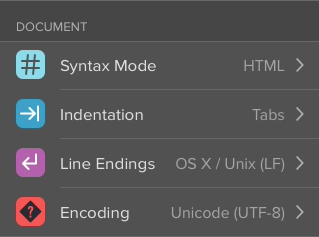
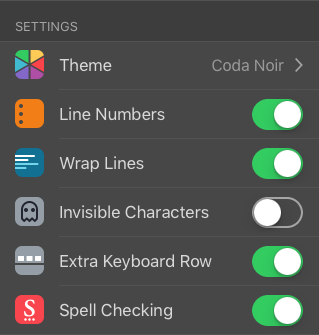
- Syntax Mode
- Displays the syntax mode currently in use. Tap to select a different mode.
- Indentation
- Change the indentation settings for the current document.
- Line Endings
- Code Editor supports the following line endings:OS X / Unix (LF), Windows (CRLF), Classic Mac OS (CR), Paragraph Separator (PSEP), and Line Separator (LSEP).
- Encoding
- Displays the encoding settings for the current document. Tap to change encoding.
- Theme
- Choose the color, font, font size, and line height used in the editor.
- Line Numbers
- Show or hide the line numbers gutter on the left side of the editor.
- Wrap Lines
- Enable or disable line wrapping in the editor.
- Invisible Characters
- Show or hide invisible characters in the editor.
- Extra Keyboard Row
- Show or hide the extra keyboard row in the editor.
- Spell Checking
- Enable or disable automatic spell checking in the editor.
Text Manipulation
Beyond just typing characters into the editor, Code Editor offers a number of features to make writing code faster than ever.
The accessory keys above the iOS keyboard allow for quick access to many commonly used keys.

When using an external keyboard there are a number of shortcuts for moving the cursor and selecting text. A full list of the keyboard commands supported in Code Editor can be found here.
Tap and hold to use the Super Loupe, a Code Editor exclusive that provides extra magnification to precisely set your cursor.
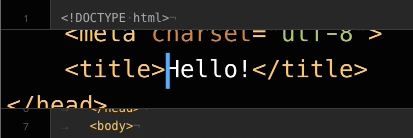
Select text in the editor for quick access to Comment, Indent/Dedent, and Entab/Detab functions (in addition to Cut, Copy, etc.).
Autocomplete
Code Editor includes autocompletion features that are supported for many common web programming languages, including HTML, JavaScript, CSS, PHP, and more.
In this screenshot, Code Editor is offering potential completions for the text <st that was just typed into this HTML document:

If Code Editor’s first guess (highlighted) is correct, simply press tab. Alternately, tap any of the displayed options to complete the text and create the corresponding closing tag.
By default, Code Editor indents new lines to match the indentation level of the immediately previous line. It uses tab characters (instead of spaces) with a tab width of 4 spaces. You can change the default indentation settings in the document settings.
Clips
Clips are lightweight snippets of text that can be quickly inserted into your editor document. They can contain any text you might need to frequently reuse, such as a particular chunk of code, a mailing address, legal boilerplate, or a template for an entire web page. It’s up to you.
Code Editor comes with a few default clips to get you started. You can delete these if you don’t want them.
Clips can exist in one of three scopes: Global, Site, or Syntax Mode. The switcher at the top of the Clips popover selects which of these three scopes you are viewing in the sidebar: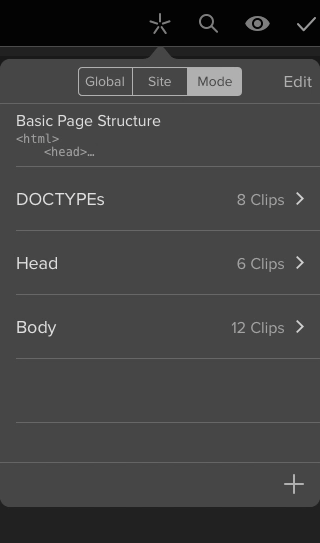
Global clips are available anywhere in Code Editor, regardless of which Site you’re connected to, or which programming language you’re writing in.
Site clips are associated only with the currently open Site. This is ideal for clips that are only used in one particular project.
Syntax Mode clips are associated only with the currently active syntax mode. This allows you to, for example, separate your HTML clips from your CSS clips.
To create a new clip, click the + button at the bottom of the Clips popover. A clip is created in the current scope, and the clip editor appears.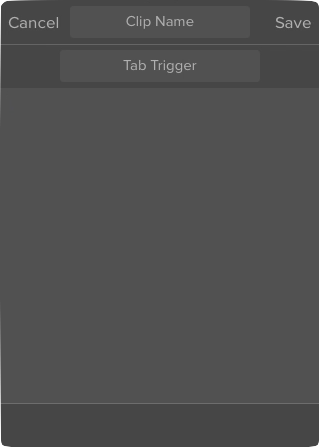
At the top of the clip editor is the name of the clip. In addition to making it easier for you to identify clips, you can autocomplete a clip in the editor by partially typing its name or tab trigger.
There are several ways to insert a clip into your document:
- Tap the clip in the Clips sidebar to insert it at the current insertion point
- Activate the clip’s tab trigger
- Type the beginning of the clip’s name and select it via the autocomplete mechanism
Any clip may contain one or more placeholders. If you think of a clip as a template, placeholders represent the areas of the template that are to be filled out later.
The available types of placeholders are:
- Custom
- A custom placeholder appears as a blue token in the editor after the clip is inserted. The first placeholder in your clip will be selected after insertion, and you can simply type over it with your desired text.
- Insertion Point
- This placeholder indicates where you’d like the editor’s insertion point to be placed after the clip is inserted.
- Date
- Inserts the current date in M/D/YY format.
- File Name
- Inserts the name of the current file.
- Parent Folder
- Inserts the name of the parent folder for the current file.
- Site Name
- Inserts the name of the current Site.
- Remote URL
- Inserts the remote URL for the current Site.
- Text Selection
- This placeholder will be replaced with the currently selected text when the clip is inserted.
- Previous Word
- This placeholder will be replaced with the word immediately before the insertion point when the clip is inserted.
Find and Replace
Code Editor can perform find and replace operations in the current editor document. To open the find banner, tap the magnifying glass icon in the upper right section of the document tab bar.
From left to right, the find banner contains the following items:
- Search Settings
- Tap the gear icon to enable or disable Case Sensitivity, Regular Expressions, and the ability to Search in Selection.
- Find and Replace Fields
- Type the text you wish to find in the Find field. If you want to replace the found text with alternate text, then type the desired replacement text into the Replace field.
- Previous / Next Buttons
- The previous & next buttons find the previous and next occurrences of the text in the Find field. The matched text will be selected in the editor, and will briefly flash to draw your attention to it.
- Replace
- Replaces the currently selected find result with the text in the Replace field.
- Close Button
- Dismisses the find banner. If you are using an external keyboard you can also close it by pressing the Esc key while the find banner has keyboard focus.
Using Placeholders in Find and Replace
Placeholders can be used to perform find and replace operations when the desired text varies, but follows a consistent pattern.
Consider this text:
If you wanted to swap the values of the width and height attributes of these two lines, you could do so with a single find and replace operation by using placeholders.
Placeholders are inserted by taping the star icon located in the Find and Replace fields:![]()
Each placeholder in the Find field is numbered sequentially. Find placeholders represent an arbitrary sequence of text appearing at that point. For example:![]()
…will match any occurrence of “img src” followed by an equals sign, quotation mark, any sequence of text, and ending with another quotation mark. That entire sequence, beginning with the letter “i” and continuing to the last quotation mark is considered the match:
If you perform a replace, any placeholders in the Replace field will assume the value of whatever was matched by the same-numbered placeholder in the Find field.
Let’s look again at our earlier example code:
To do this, set up the Find and Replace fields as so:![]()
Notice that the Find field matches the general pattern we are looking for, and the Replace field swaps placeholders 1 and 2.
Tap replace twice to replace both instances in the example text. The width and height attributes have swapped values without affecting the rest of the document:
You don’t have to use any placeholders in the Replace field. This is a quick way to remove text that follows a pattern.
Let’s say we want to take this same text again, and simply get rid of the width and height attributes completely without affecting the rest of the text.
Set up the Find and Replace fields like this:![]()
Note that the Replace field is completely blank, indicating that we wish to replace any matched text with nothing, effectively deleting it.
There’s also an extra space inserted at the beginning of the Find field to match the space between the src attributes and the width attributes in our example code.
After replacing all occurrences we have the desired result:
The Terminal
Terminal tabs allow you to access the command line shell on a remote server.
Begin by creating a new Terminal tab. The first thing you will see is the connection panel: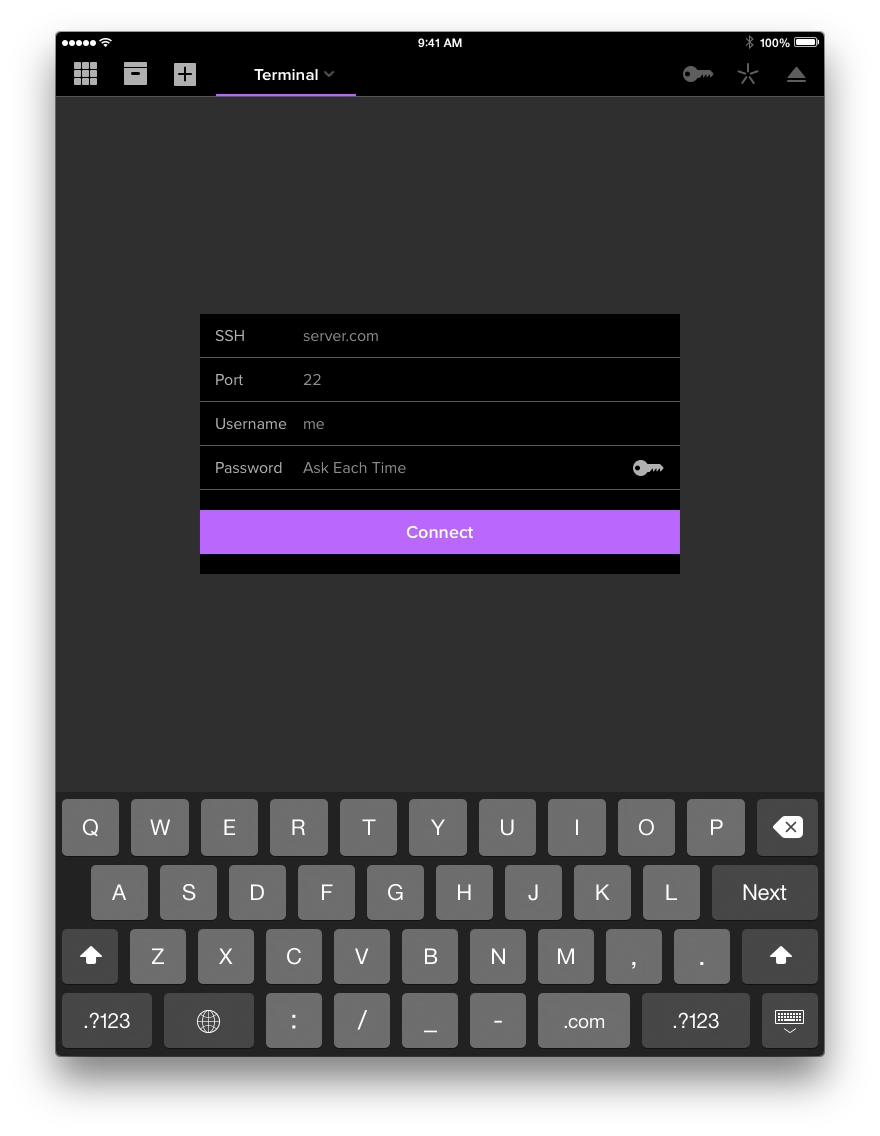
If your Site has been configured with Terminal credentials, the connection panel will be pre- filled with those. Refer to the Sites chapter for more information.
Otherwise, you will need to manually fill out the panel. The connection panel contains the following fields:
- SSH
- Enter the address of the server you wish to connect to via SSH.
- Port
- Optionally, you can enter a port number to connect on. If you don’t, the default of port 22 will be used.
- User Name
- The user name of the account you wish to log into.
- Password
- The password required for the above user name. (If you use private keys instead of passwords to connect to the web server, tap the key icon in this field and select the appropriate key file. The key icon will glow blue if a private key is associated with the site.)
If you’d prefer to not store your passwords in the iOS keychain you can leave the password blank and enter it during the connection process.
After your server details have been entered tap the Connect button. Assuming the connection succeeds, the connection panel will be replaced by the Terminal view.
The Terminal view works more or less just like the Terminal app provided with OS X. All further operations are performed by typing commands with your keyboard.
Terminal Actions and Settings
In addition to the built in autocomplete the Code Editor Terminal supports copy and paste of text, just like the editor. To display this option, double tap the buffer after connecting.
Once you’ve connected to the server you will see terminal specific buttons on the right side of the tab bar. ![]()
- Keys
- View, import, or create keys that can be used for SSH connections.
- Clips
- Stores and manages a collection of text clippings that can be quickly inserted into the terminal.
- Eject
- Closes the buffer and disconnects from the remote server.
Additional settings can be accessed by tapping on the Terminal tab itself.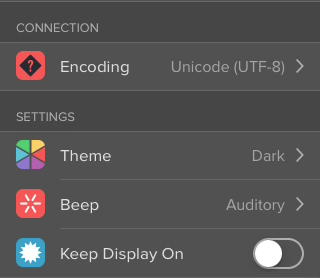
- Encoding
- Displays the encoding for the current connection. Tap to change to a different encoding.
- Theme
- Quickly switch between color themes, and set the font family and size used in the terminal.
- Beep
- Select auditory beep, visual beep, or disable it altogether.
- Keep Display On
- Enable this option to prevent your iOS device from sleeping when the terminal is connected.
The Preview Tab
The easiest way to preview your web pages as you work in Code Editor is to use the built-in preview mechanism. Code Editor renders previews using the WebKit framework. This means that in most cases what you see previewed in Code Editor will be the same as what you would see in Mobile Safari.

When the Preview tab is active, forward and back controls appear to the left of the URL bar.
On the right side of the bar you will see options to refresh the page, share a screenshot, or open the browser console.
Previewing Static HTML
The simplest scenario is previewing a single static HTML page, as this can be done without any server-side processing.
You can preview a static HTML document you are editing by clicking the Preview segment in the tab bar. You can also use a standalone preview tab if preferred.
Previewing Dynamic Websites
A “dynamic” website is any whose pages are wholly or partially generated at load time by server-side processing. This includes technologies such as Server-Side Includes (SSI), PHP, Ruby on Rails, and more.
Code Editor is capable of previewing dynamic websites, but needs some configuration information to know where to look You provide this information by creating a Site. Refer to the “Sites” chapter for more information.
Since dynamic websites require server-side processing, you must configure the Site with at least a Remote Root and a Root URL. These are the remote filesystem path and URL respectively to the root of your website.
Armed with this knowledge, Code Editor can correlate a remote file with a particular URL. For example, if you’re editing a file located in /about/contact-us.php relative to the Remote Root, Code Editor will know to append /about/contact-us.php to the Root URL when you preview it.
Dynamic Sites with Routed URLs
Some web frameworks use dynamic URL “routing”, where there may not be a one-to-one correlation between a URL and a single file on disk.
At the time of this writing, Code Editor doesn’t have a means to associate arbitrary URLs with particular files.
One option is to manually enter a specific URL in a preview tab or split. When you save a file, Code Editor will reload this URL. This means you can edit a controller, model, or view associated with the URL and preview the resulting dynamically generated page. The Preview won’t navigate away from a manually entered URL unless you do so by clicking a link, for example.
The Playground
Access The Playground by creating a new Playground tab from the Tab Bar. Code Editor’s Playground is a simple REPL environment that provides a way to interactively run JavaScript and see the results. It can be used for debugging, testing, or experimentation.
Tab-to-complete variables, functions, and properties that you define in a Playground and existing JavaScript files imported from Code Editor’s local storage.
The Playground contains the following built-in functions:
General Functions
help()- Displays help information
require("path/to/file.js")- Imports a local JavaScript file by path (relative to the active site root)
clear()- Clears the screen of output
reset()- Resets the playground environment to a pristine state
File System
fs.access(path)- Returns an integer describing the access to a file at a path (relative to the site root): ‘0’ Not accessible, ‘2’ Read-only, ‘4’: Read-write
fs.copy(path, newPath)- Copies a file from one path to another (relative to the site root)
fs.listdir(path)- Returns the contents of the directory at a path (relative to the site root)
fs.mkdir(path)- Creates a directory at a path (relative to the site root)
fs.move(path, newPath)- Moves a file from one path to another (relative to the site root)
fs.remove(path)- Deletes the file at a path (relative to the site root); If the path points to a directory, throws an error (see fs.rmdir)
fs.rmdir(path)- Deletes the directory at a given path, including all contents (relative to the site root)
fs.stat(path)- Returns a File Stat object for the file at a given path (relative to the site root)
File Stats
s.isFile()- Returns whether the file is a regular file
s.isDirectory()- Returns whether the file is a directory
s.isSymbolicLink()- Returns whether the file is a symbolic link
s.atime- The access time of the file (when the file was last read)
s.ctime- The change time of the file (when the file stats last changed)
s.mtime- The modified time of the file (when the file content last changed)
s.birthtime- The birth time of the file (when the file was created)
s.size- The size of the file (in bytes)
File Objects
f.read([length])- Reads a number of bytes from the file as a string, or the remaining contents if no length
f.readline()- Reads the next line of the file as a string
f.readlines()- Reads the remaining lines of the file as an array of strings
f.write(string)- Appends a string to the file
f.tell()- Returns the current file offset
f.seek(offset[, fromWhat])- Moves the current file offset relative to an absolute position (number): ‘0’ beginning of file, ‘1’ current offset, ‘2’ end of file
f.close()- Closes the file
File Modes
"r"- Open the file for reading; If no file exists this throws an error (default)
"r+"- Open the file for reading and writing; If no file exists it is created
"w"- Open the file for writing; If no file exists, it is created; If one already exists, it is overwritten
"a"- Open the file for appending; If no file exists, it is created
Settings
Code Editor’s settings can be accessed from the gear icon at the top of the main sites view.

The following sections can be accessed through settings:
- Panic Sync
- Create an account to automatically keep your sites, clips, and credentials in sync between devices.
- Touch ID & Passcode
- When enabled, you will be prompted to enter passcode or Touch ID authentication when you open Code Editor.
- Keys
- Generate, import, and manage keys used for SFTP and SSH connections in Code Editor.
- Editing
- Editor configurations settings, including EditorConfig, Custom Fonts, or associate a non-defined file type with one of Code Editor’s supported languages. Supported Syntax Modes and Custom Syntax instructions can be found here. Instructions for importing custom fonts can be found here.
- Notifications
- Disable/Enable background notifications for transfer related activities.
- Transfers
- Set global conflict rules for file transfers and enable TLS 1.2 for encrypted FTP connections.
- About Code Editor
- Displays the version of Code Editor you are currently running on your iOS device.
- Support
- Access Code Editor’s support resources and save a copy of Code Editor’s connection transcript. More information about technical support for Code Editor can be found in the Getting Help section below.
Getting Help
Technical support for Code Editor is provided via email. Our support email address is coda-ios@panic.com
In your email, please mention the version of Code Editor you are using, and which version of iOS.
To get the fastest and most accurate response please describe what you were trying to do, what you expected to happen, and what actually happened. Also describe any steps you have already taken to try to solve the problem. The more detail you can provide, the better.
A screenshot of the problem (especially if an error message appears) is almost always helpful in troubleshooting. Press the home and sleep/wake buttons on your iOS device at the same time to save a screenshot to your Camera Roll.
For issues with unexpected disconnects or incomplete transfers, we will usually need a transcript of the session in which the problem occurred. Choose Settings → Support → Email Support with Transcript to quickly draft an email with this information included.
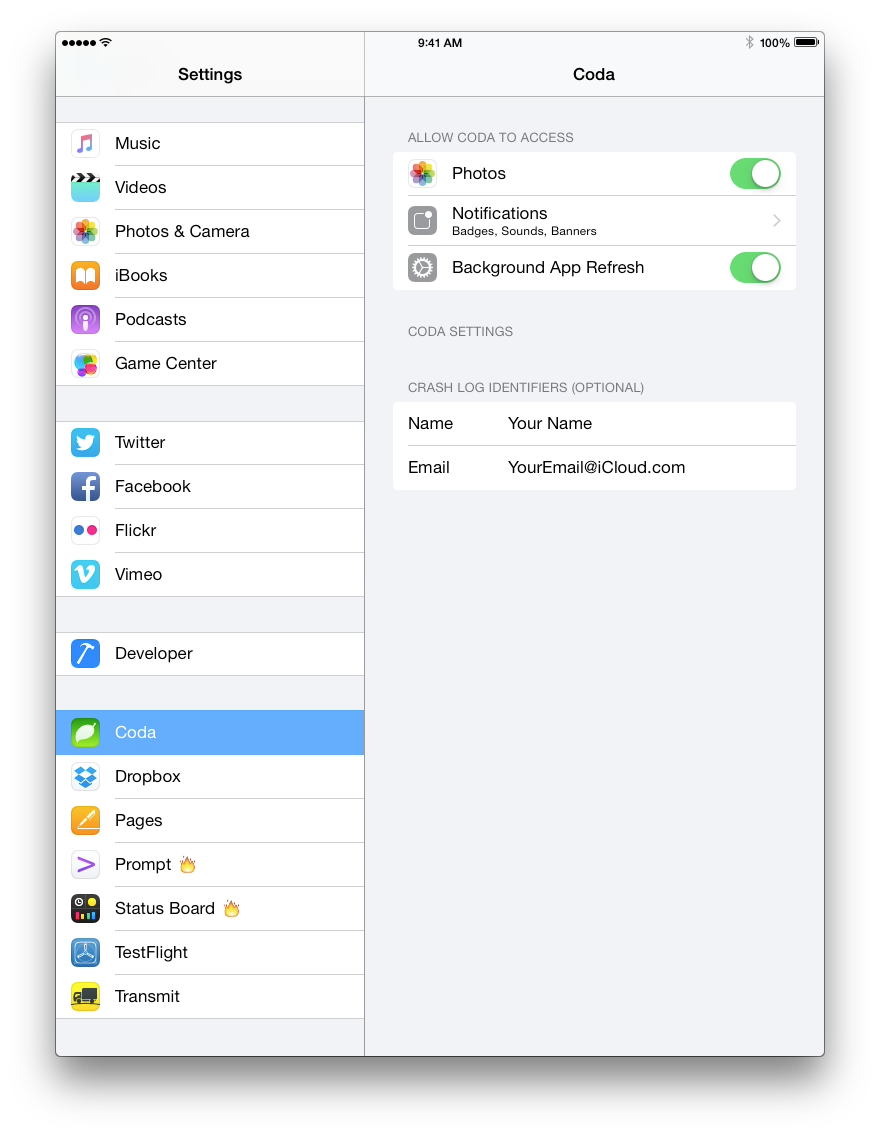
For crashing issues Code Editor will usually offer to submit a bug report on your behalf the next time you open it. Please make sure to add your name and email address in the Code Editor section of Settings.app so that we can refer your crash report directly.
