The Clips sidebar is where you store and manage clips.
Clips are lightweight snippets of text that can be quickly inserted into your editor document. They can contain any text you might need to frequently reuse, such as a particular chunk of code, a mailing address, legal boilerplate, or a template for an entire web page. It’s up to you.
Clips Scope
Clips can exist in one of three scopes: Global, Project, or Extensions. The switcher at the top of the Clips sidebar selects which of these three scopes you are viewing in the sidebar:
- Global clips
- are available in any Nova Project.
- Project clips
- are associated only with the currently open Project. This is ideal for clips that are only used in a particular instance.
- Extensions clips
- are added by installing extensions from the Nova Extension Gallery.
Creating a Clip
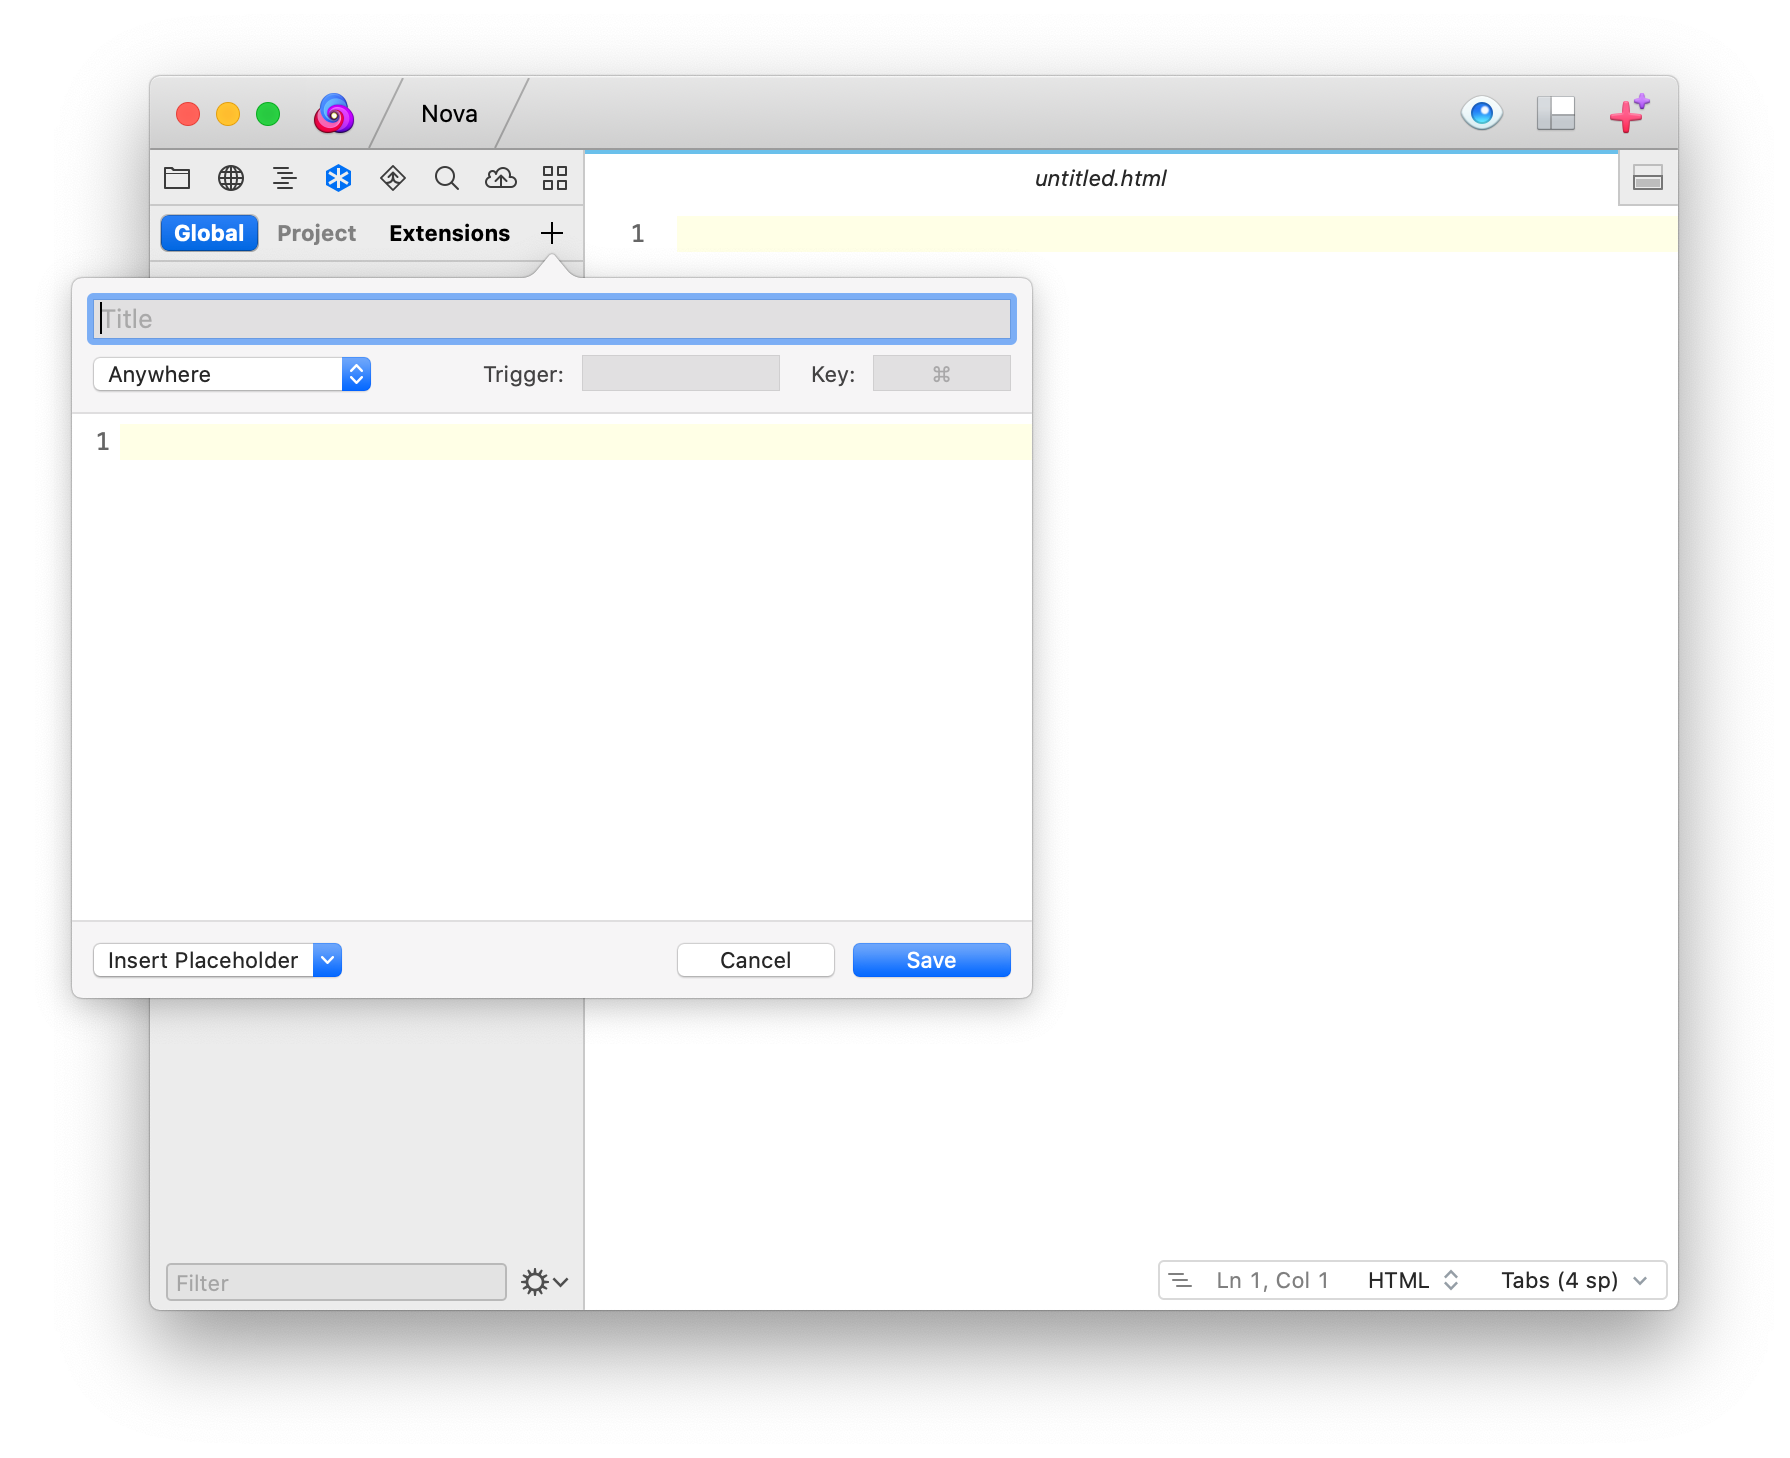
To create a new clip, click the + button at the top of the Clips sidebar, and choose Add Clip. A clip is created in the current scope, and the clip editor appears.
At the top of the clip editor is where you set the title of the clip.
The Trigger field lets you assign text that can be used to insert the clip into a document by typing the trigger then pressing the Tab key. Note that triggers are case-sensitive.
The Key field lets you bind a keyboard shortcut to insert this clip. To do so, click in the field, and press the desired shortcut key combination on your keyboard. The field will not accept a shortcut that is already bound to another function in Nova.

The large middle section of the clip editor is the actual content to be inserted into your document when the clip is activated.
The Insert Placeholder pop-up button allows you to add placeholders into the content of your clip. More on that in a moment.
Finally, the Cancel and Save buttons will discard or keep any changes you have made in the clip editor.
Placeholders
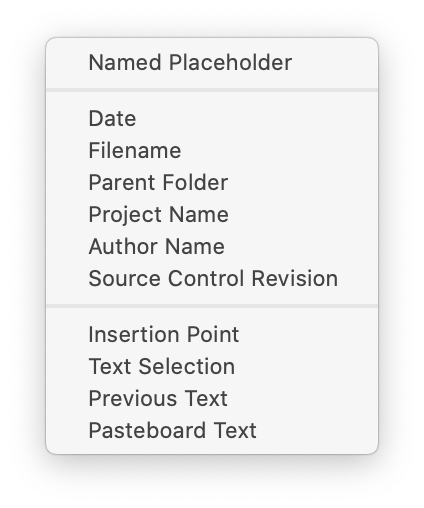
Any clip may contain one or more placeholders. If you think of a clip as a template, placeholders represent the areas of the template that are to be filled out later. The available types of placeholders are:

Named Placeholder
A named placeholder appears as a blue token in the editor after the clip is inserted. When you insert a clip that contains placeholders, the first placeholder will be selected, and you can simply type over it with your desired text. Choose Go > Next Placeholder to select the next placeholder in the document, if there’s more than one.
Insertion Point
This placeholder indicates where you’d like the editor’s insertion point to be placed after the clip is inserted.
Pasteboard Text
The current contents of your pasteboard will be added at this position when the clip is inserted.
File And Project Information
Date, Filename, Parent Folder, Project Name, Author Name, and Source Control Revision will add the corresponding text at the chosen position when the clip is inserted.
Text Selection
This placeholder will be replaced with the currently selected text when the clip is inserted. This is useful for clips that wrap existing content.
Previous Text
This placeholder will be replaced with the word immediately before the insertion point when the clip is inserted.
Inserting a Clip
There are several ways to insert a clip into your document:
- Double click the clip in the Clips sidebar to insert it at the current insertion point
- Drag the clip into an editor document to insert it at a particular position
- Press the clip’s key shortcut, if one is defined
- Type the beginning of the clip’s title and choose it from the autocomplete list
- Type the clip’s trigger text, then press Tab
Since typing in the editor will replace any existing text selection, you should use one of the mouse-driven methods rather than the keyboard to insert a clip that requires knowledge of the current text selection.
Deleting a Clip
To delete a clip, select it in the Clips sidebar and choose Edit > Delete. Alternatively, just select the unwanted clip and press the delete key.
Grouping and Reordering Clips
You may find it useful to group clips in certain ways. For example, you may wish to keep clips that simply insert a block of text separate from those that perform manipulation of the current text selection.
To create a new clip group, click the + button at the top of the Clips sidebar, choose Add Group, and type a name for the new group that appears.
You can rearrange clips and place them into groups by dragging and dropping them. Clip groups can be deleted the same way as clips.
Importing and Exporting Clips
You can import and export clips which is useful for both backing them up or sharing them with other Nova users.
Importing Clips
Click the gear icon at the bottom of the Clips sidebar, then choose Import Clips…. Select an exported clips file from the file dialog that appears.
Exporting Clips
Select at least one clip from the Clips sidebar. You can hold down the shift key to select a range of clips, or the command key to select/deselect individual clips. Then, click the gear icon at the bottom of the Clips sidebar, and choose Export Clips…. Select a name and location for the export file in the file dialog that appears.